Hello everyone,
I am happy to post my first blog post. This post is demonstrating you about an application of Leap Motion Sensor by using Raspberry Pi. As the name itself suggest about the project, we are converting a RC(Remote control) car to a LC(Leap control) car. The complete step-by-step procedure to make this project is given below.
Prerequisites:
- Leap Motion sensor
- RC car
- Raspberry Pi
- Laptop
- Breadboard
- Connecting wires
- 6F22 9V battery - 2
- Battery cap - 2
- Windows 7/8
- Relay - 5
- Transistor - 5
- Diode - 5
- Resistor - 5
- Multi-meter
- Soldering Iron
- HDMI cable / LCD screen
- Keyboard
- Mouse
- LAN cable
- 8 GB SD card
- USB cable
Note :
1 . You can find video here ... YouTube Video2 . You can find complete code with instruction(in comments) here: LCcar-Leap-Control-Car
Leap Motion Sensor:
The Leap Motion controller is a small USB peripheral device which is designed to be placed on a physical desktop, facing upward. Using two monochromatic IR cameras and three infrared LEDs, the device observes a roughly hemispherical area, to a distance of about 1 meter (3.28084 feet). The LEDs generate pattern-less IR light and the cameras generate almost 300 frames per second of reflected data, which is then sent through a USB cable to the host computer, where it is analyzed by the Leap Motion controller software using "complex maths" in a way that has not been disclosed by the company, in some way synthesizing 3D position data by comparing the 2D frames generated by the two cameras.
(Reference: Wikipedia)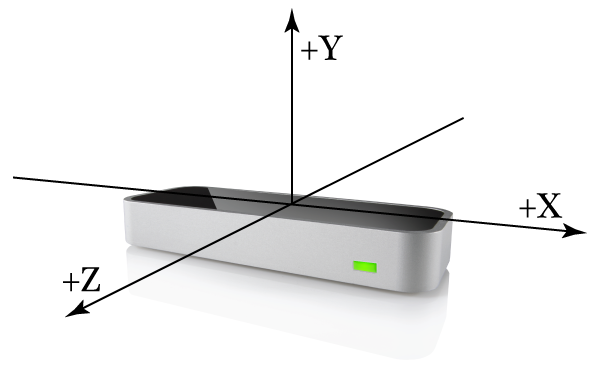
Raspberry Pi:
The Raspberry Pi is a low cost, credit-card sized computer that plugs into a computer monitor or TV, and uses a standard keyboard and mouse. It is a capable little device that enables people of all ages to explore computing, and to learn how to program in languages like Scratch and Python. It’s capable of doing everything you’d expect a desktop computer to do, from browsing the internet and playing high-definition video, to making spreadsheets, word-processing, and playing games. more...
(Reference: https://www.raspberrypi.org/ )

Description:
Step - 1: Installing Raspbian on Raspberry Pi
There are many operating systems, which can be supported by raspberry pi. Here we are installing Raspbian OS on raspberry pi. For installation, we need 8 GB memory card as well as image file of OS, witch can be downloaded from here. You can install another OS from mentioned link. If you are working on windows then for making bootable to this memory card you have to install "win32 disk imager". After installing this imager software, you can follow this tutorial to install raspbian.
Step - 2: Setting up your windows PC to work on Leap Motion Sensor
Now, you raspberry pi is ready to use. You can connect it with laptop or monitor using HDMI cable to see GUI and tools which is inbuilt in Raspbian OS. Now it's time to setup our laptop which will take data from Leap Motion Sensor. So first, you have to go to leap motion website: leapmotion.com
And sign up for downloading SDK according to your OS on laptop. Once, you will get a .zip file, unzip it and run installer. more...
Step - 3: Enable raspberry pi to connect with laptop's Ethernet port
Here, we will collect frame data of hand/hands from LM sensor using laptop and data will be sent to raspberry pi to react according to hand gesture. For making it possible, we have to setup our laptop to share its network using LAN cable with raspberry pi. So that, we have to follow simple steps with is clearly mentioned in this blog Connecting to Pi from Laptop's Ethernet Port.
No comments:
Post a Comment